用 Let's Encrypt 配置网站 HTTPS
用 Let’s Encrypt 配置网站 HTTPS
Let’s Encrypt 介绍
Let’s Encrypt 是一家免费提供 SSL 证书签发的 CA 机构,旨在推进网站从 HTTP 向 HTTPS 过度的进程。
主要优缺点有:
- 永久免费
- 申请简单:设计了 ACME 协议,可以用客户端自动即可申请,没有人工过程,目前官方推荐的客户端是 certbot
- 有许多大厂支持,Mozilla、思科、Akamai、IdenTrust、Facebook 和 EFF 等,稳定有效
- 2018 年 3 月推出了 ACMEv2 协议,开始支持通配符证书(泛域名)申请方式
- 获得 IdenTrust 交叉签名,可以被 Mozilla、Google、Microsoft 和 Apple 等主流的浏览器所信任
- 缺点:90 天有效期,需要定期续约,不过也很简单
准备工作
题外话,一些准备工作
- 买域名:很多途径 万网、阿里云域名交易、GoDaddy 都可以,这里用一个 http://www.oou.fun 做例子
- 备案:懂的,在国内需要备案才能正常访问。 阿里云备案服务,整个过程三到五天,需要拍照、打印、上传、等待
安装 certbot
环境:
- CentOS 7
- Nginx
根据 certbot 官网的安装说明 进行安装,会有一堆依赖版本问题。安装步骤
- 需要安装 EPEL
sudo yum install epel-release - 安装 Certbot
sudo yum install python2-certbot-nginx
这样应该就装好了,但是实际运行起来会有多个问题:
- 报错
urllib3版本太低。可以卸载后重新安装sudo pip uninstall urllib3 sudo yum install python-urllib3 - 报错
phOpenSSL版本不匹配。可以手动下载新版本安装,参考wget http://mirrors.163.com/centos/7.5.1804/cloud/x86_64/openstack-ocata/common/pyOpenSSL-0.15.1-1.el7.noarch.rpm sudo rpm -Uvh pyOpenSSL-0.15.1-1.el7.noarch.rpm sudo yum install certbot sudo yum -y install yum-utils sudo yum-config-manager --enable rhui-REGION-rhel-server-extras rhui-REGION-rhel-server-optional
所以后来改成从 GitHub 获取,就一次搞定了,第一次运行会安装所有依赖:
git clone https://github.com/certbot/certbot.git --depth=1
 ./certbot-auto ...
生成证书
一些参数说明
certonly:只创建证书-d 域名:要注册哪个域名,可以多个-d "*.oou.fun" -d oou.fun--email注册的 email 地址:需要有个 email 来注册,可以在命令中直接指定了--email yinguwei@gmail.com--agree-tos同意协议:可以在过程中 Y,也可以命令中直接同意--server注册地址,默认是 V1,V2 好像也不需要指定--server https://acme-v02.api.letsencrypt.org/directory--webroot -w /usr/local/nginx/cert证书直接过去
详细的参数说明
一些例子:
./certbot-auto certonly --standalone --email yinguowei@gmail.com -d oou.fun -d www.oou.fun --agree-tos
泛域名方式:
./certbot-auto --server https://acme-v02.api.letsencrypt.org/directory -d "*.xxx.com" --manual --preferred-challenges dns-01 certonly
指定server(非必要)
certbot certonly --preferred-challenges dns --manual -d *.yourdomain.com --server https://acme-v02.api.letsencrypt.org/directory
certbot-auto certonly -d *.newyingyong.cn --manual --preferred-challenges dns
另外有个高级的 acme.sh 客户端可以自动:
- https://blog.csdn.net/kikajack/article/details/80408145
- https://github.com/Neilpang/acme.sh
我的最终版
./certbot-auto certonly -d "*.oou.fun" -d oou.fun --manual --preferred-challenges dns --email yinguwei@gmail.com --agree-tos
会提示到域名里面设置个 txt
- - - - - - - - - - - - - - - - - - - - - - - - - - - - - - - - - - - - - - - -
Please deploy a DNS TXT record under the name
_acme-challenge.oou.fun with the following value:

RPE9M1AX0O746u30nxtcoZUDW95R88SzaspjQZmjWBg

Before continuing, verify the record is deployed.
- - - - - - - - - - - - - - - - - - - - - - - - - - - - - - - - - - - - - - - -
Press Enter to Continue

- - - - - - - - - - - - - - - - - - - - - - - - - - - - - - - - - - - - - - - -
Please deploy a DNS TXT record under the name
_acme-challenge.oou.fun with the following value:

Oj_WlJ_DQ5oGAvt3rVznRQN_fEcyXkmAf9vGmmHnPJ4

Before continuing, verify the record is deployed.
- - - - - - - - - - - - - - - - - - - - - - - - - - - - - - - - - - - - - - - -
要到 阿里云后台云解析DNS 里面设置新解析规则,而且中间还要再变一次
提示修改内容时不要急,先测试域名解析是否生效可以用 Linux 工具 dig,成功解析到了再让 certbot 继续验证:
yum install bind-utils
dig _acme-challenge.oou.fun txt
dig -t txt _acme-challenge.newyingyong.cn @8.8.8.8
然后就生成成功了
IMPORTANT NOTES:
 - Congratulations! Your certificate and chain have been saved at:
   /etc/letsencrypt/live/oou.fun/fullchain.pem
   Your key file has been saved at:
   /etc/letsencrypt/live/oou.fun/privkey.pem
   Your cert will expire on 2019-02-05. To obtain a new or tweaked
   version of this certificate in the future, simply run certbot-auto
   again. To non-interactively renew *all* of your certificates, run
   "certbot-auto renew"
其他命令
查看证书
./certbot-auto certificates
校验证书
openssl x509 -in /etc/letsencrypt/archive/oou.fun/cert1.pem -noout -text
三个月内更新证书
certbot-auto renew
但是如果是使用了泛域名方式申请的证书,还需要指定手动方式并提供身份认证,如果是阿里云的服务器可以用一个 python 的脚本 结合在阿里云申请的 accesskey 来完整更新,修改里面的 Key Id 和 Secret:
在阿里云的域名配置里面把 _acme-challenge 这个设置删掉或改名空出来,然后执行:
./certbot-auto renew --cert-name oou.fun --manual-auth-hook /root/certbot-letencrypt-wildcardcertificates-alydns-au/python-version/au.sh
就会发现类似在申请时一样的在阿里云上生成这个配置并通过认证。
最好设置 Nginx 重新加载,或者设置自动定时更新
30 1 10 * * /usr/bin/certbot renew && /usr/sbin/nginx -s reload # 每月10日1点30分执行一次
Nginx 配置
接下来要把证书配置到 Nginx,原来的配置文件:/etc/nginx/confg.d/default.conf:
server {
    listen       80;
    server_name  localhost;

    #charset koi8-r;
    #access_log  /var/log/nginx/host.access.log  main;

    location / {
        root   /usr/share/nginx/html;
        index  index.html index.htm;
    }
}
在 /etc/nginx/confg.d/ 下面新建一个 ssl.conf,指定证书地址,开启 ssl 和 443 端口
server {
    server_name oou.fun;
    listen 443 http2 ssl;
   # ssl on;
    ssl_certificate /etc/letsencrypt/archive/oou.fun/fullchain1.pem;
    ssl_certificate_key /etc/letsencrypt/archive/oou.fun/privkey1.pem;
    ssl_trusted_certificate  /etc/letsencrypt/archive/oou.fun/chain1.pem;

    location / {
        root   /usr/share/nginx/html;
        index  index.html index.htm;
    }
}
重新加载使配置生效
nginx -s reload
就好了。证书信息
限制只用 HTTPS 访问
如果还想要仅限 https ,可以用 rewrite
default.conf
server {
    listen 80 default_server;
    listen [::]:80 default_server;
    server_name oou.fun;
    rewrite ^(.*) https://$server_name$1 permanent;
}
附:DNS 解析相关设置
用 Docker 构建禅道环境
用 Docker 构建禅道环境
禅道简介
禅道是个不错的国产的开源项目管理软件,在国内很受欢迎。有分开源版、专业版、和企业版,这里介绍的是开源版
一些地址
- 禅道官网
- 本文所构建的禅道 docker 镜像,源码
- 禅道开源版 LDAP插件
之前也有些可用的禅道开源版 docker 镜像,但是都是基于一键安装版本的,如 lijiapengsa/zentao ,本文介绍的是用源码构建方式。
当前版本
目前还在维护的版本有 9 和 10,7、8 版本以前虽然在公司也在用,但是基本不更新了。而且 10 版本虽然刚出没多久,但是界面完全重绘(Vue),更新发布较快。
- 9.8.3(界面比较经典的版本,在10 出来后版本9基本就不更新了)
- 10.4(目前最新版,也叫 10.4.stable)
- 还有个在 Azure 上的 PaaS 版本 版本是 8,不做考虑
镜像构建
Dockerfile
完整的 Dockerfile,禅道版本 10.4:
FROM php:7.2.8-apache-stretch

LABEL maintainer="yinguowei@gmail.com"

ENV DEBIAN_FRONTEND noninteractive

RUN set -x \
    && apt-get -y update \
    && apt-get install -y --no-install-recommends apt-utils unzip \
    && rm -rf /var/lib/apt/lists/*

# 安装禅道需要的组件
RUN docker-php-ext-install -j$(nproc) pdo_mysql \
    && mkdir /php_session_path \
    && chmod o=rwx -R /php_session_path \
    && echo "session.save_path = \"/php_session_path\"">>/usr/local/etc/php/php.ini

ENV ZENTAO_VERSION 10.4

# 获取源码包
# 如果网络有问题就改成本地拷贝:ADD ZenTaoPMS.$ZENTAO_VERSION.stable.zip /var/www/html/
ADD http://dl.cnezsoft.com/zentao/$ZENTAO_VERSION/ZenTaoPMS.$ZENTAO_VERSION.stable.zip /var/www/html/
RUN unzip /var/www/html/ZenTaoPMS.$ZENTAO_VERSION.stable.zip && rm -f /var/www/html/ZenTaoPMS.$ZENTAO_VERSION.stable.zip

# 加上自动跳转页面
RUN echo "<html>\n<head>\n<meta http-equiv=\"refresh\" content=\"0;url=/zentaopms/www/\">\n</head>\n</html>" > /var/www/html/index.html

# 备份目录挂载卷
RUN mkdir -p /var/www/html/zentaopms/tmp/backup && chmod 777 /var/www/html/zentaopms/tmp/backup
VOLUME /var/www/html/zentaopms/tmp/backup
源码说明
- 基于官方 php 版本构建
FROM php:7.2.8-apache-stretch
- 安装 php 插件
禅道要安装多个php插件有:pdo,pdo_mysql,json,filter,不过只有 pdo_mysql 默认没有装
RUN docker-php-ext-install -j$(nproc) pdo_mysql
注:docker-php-ext-install 是 php 容器提供用于安装插件的工具,在
/usr/local/bin/下面
- 配置 session path
禅道需要一个明确的存放 session 的路径配置,镜像中没有默认的 php.ini,自己生成一个(不知道为什么,之前基于 Ubuntu 的镜像里面却有一个完整的 php.ini,在目录 /usr/src/php 下)
RUN mkdir /php_session_path \
    && chmod o=rwx -R /php_session_path \
    && echo "session.save_path = \"/php_session_path\"">>/usr/local/etc/php/php.ini
- 创建自动跳转页
在 Apache 项目根目录创建个 index.html,用来在没有指定上下文的时候自动重定向到
/zentaopms/www/去
RUN echo "<html>\n<head>\n<meta http-equiv=\"refresh\" content=\"0;url=/zentaopms/www/\">\n</head>\n</html>" > /var/www/html/index.html
编译镜像并提交
构建镜像并提交到 docker hub,注意不要把任何公司相关的配置提交到镜像里
- 先要去 docker hub 创建这个镜像的定义
- 然后本地编译执行:
docker login
docker build -t yinguowei/zentao:10.4.stable .
docker tag yinguowei/zentao:10.4.stable yinguowei/zentao:10
docker tag yinguowei/zentao:10.4.stable yinguowei/zentao:latest
docker push yinguowei/zentao:10.4.stable
docker push yinguowei/zentao:10
docker push yinguowei/zentao:latest
提交成功后就可以在镜像首页 发布,增加说明等
使用镜像
简单运行
docker run -d --name zentao -p 80:80 yinguowei/zentao:10.4.stable
运行成功后访问 http://localhost
设置数据库
根据禅道设置向导设置项目配置,其中数据库的配置:(这里是我的windows数据库)
<?php
$config->installed       = true;
$config->debug           = false;
$config->requestType     = 'GET';
$config->db->host        = '10.0.75.1';
$config->db->port        = '3306';
$config->db->name        = 'zentao';
$config->db->user        = 'root';
$config->db->password    = 'test1234';
$config->db->prefix      = 'zt_';
$config->webRoot         = getWebRoot();
$config->default->lang   = 'zh-cn';
注意:
- 数据库 host 设置 10.0.75.1 是 docker 的宿主机网络网关地址,也是容器从容器中访问宿主服务的方式。
- 宿主服务器上 MySQL 要设置允许外部 ip 访问,略
- 有个小问题,登入如果报错管理员密码不对,可以试试看无痕浏览模式,可能是由于密码客户端加密后被 chrome 拦截的关系,后面去掉密码加密就好了。
用 docker-compose 运行集成 mysql
设置配置文件 docker-compose.yml
version: '3.1'

services:
  zentao:
    image: yinguowei/zentao:10.4.stable
    restart: always
    ports:
      - "80:80"
    volumes:
      - zentao_backup_data:/var/www/html/zentaopms/tmp/backup
  mysql:
    image: mysql:5.7.23
    ports:
      - "3306:3306"
    volumes:
      - zentao_mysql_data:/var/lib/mysql
    environment:
      MYSQL_ROOT_PASSWORD: zentao!23
      MYSQL_DATABASE: zentao
    restart: always
volumes:
  zentao_backup_data:
  zentao_mysql_data:
根据需要修改 docker-compose.yml 里设定的 端口
启动
docker-compose up -d
数据库就可以直接用 mysql 作为 hostname 连接
<?php
$config->installed       = true;
$config->debug           = false;
$config->requestType     = 'GET';
$config->db->host        = 'mysql';
$config->db->port        = '3306';
$config->db->name        = 'zentao';
$config->db->user        = 'root';
$config->db->password    = 'zentao!23';
$config->db->prefix      = 'zt_';
$config->webRoot         = getWebRoot();
$config->default->lang   = 'zh-cn';
其他命令:停止,删除
# 停止,删除
docker-compose stop
docker-compose rm
# 或者直接删除
docker-compose rm -fs
Nginx 设置
建议通过 Nginx 设置反向代理到禅道的镜像地址,另外还使用了 docker-gen 配置 Nginx 和 docker 更方便。
- 启动 Nginx 略
- 启动 docker-gen 略
- 启动镜像时候的设置,增加 VIRTUAL_HOST 和 VIRTUAL_PORT (默认80)设置
docker run -d --name zentao -p :80 \
  -e VIRTUAL_HOST=zentao.wilmartest.cn \
  yinguowei/zentao:10.4.stable

# Nginx 重新加载配置
nginx -s reload
这样就可以通过 http://zentao.wilmartest.cn 来访问了
集成 LDAP
禅道开源版默认没有集成 LDAP (专业版有),需要用插件来实现,这里使用了 插件 iboxpay/ldap
修改 Dockerfile
新的 Dockerfile
FROM php:7.2.8-apache-stretch

LABEL maintainer="yinguowei@gmail.com"

ENV DEBIAN_FRONTEND noninteractive

RUN set -x \
    && apt-get -y update \
    && apt-get install -y --no-install-recommends apt-utils unzip libldap2-dev \
    && rm -rf /var/lib/apt/lists/*

# 安装禅道需要的组件
RUN docker-php-ext-configure ldap --with-libdir=lib/x86_64-linux-gnu/ \
  && docker-php-ext-install -j$(nproc) pdo_mysql \
  && docker-php-ext-install ldap \
  && mkdir /php_session_path \
  && chmod o=rwx -R /php_session_path \
  && echo "session.save_path = \"/php_session_path\"">>/usr/local/etc/php/php.ini

ENV ZENTAO_VERSION 10.4

# 获取源码包
#ADD http://dl.cnezsoft.com/zentao/$ZENTAO_VERSION/ZenTaoPMS.$ZENTAO_VERSION.stable.zip /var/www/html/
ADD ZenTaoPMS.$ZENTAO_VERSION.stable.zip /var/www/html/
RUN unzip /var/www/html/ZenTaoPMS.$ZENTAO_VERSION.stable.zip && rm -f /var/www/html/ZenTaoPMS.$ZENTAO_VERSION.stable.zip

WORKDIR /var/www/html/zentaopms

# 准备工作,目录,权限
RUN touch www/ok.txt \
  && mkdir -p lib/ldap \
  && chmod 777 . \
  && chmod -R 777 lib/ldap \
  && chmod -R 777 module/user/ext \
  && mkdir -p /var/www/html/zentaopms/tmp/backup \
  && chmod 777 /var/www/html/zentaopms/tmp/backup

# LDAP 插件
#RUN curl -o module/extension/ext/ldap-master.zip https://codeload.github.com/iboxpay/ldap/zip/master \
ADD /ldap-master.zip module/extension/ext/
RUN unzip module/extension/ext/ldap-master.zip -d module/extension/ext/ \
  && mv module/extension/ext/ldap-master module/extension/ext/ldap \
  && cp -r module/extension/ext/ldap/lib/* lib/ \
  && cp -r module/extension/ext/ldap/module/* module/ \
  && mkdir -p tmp/extension/ \
  && mv module/extension/ext/ldap-master.zip tmp/extension/ldap.zip

# 加上自动跳转页面
RUN echo "<html>\n<head>\n<meta http-equiv=\"refresh\" content=\"0;url=/zentaopms/www/\">\n</head>\n</html>" > /var/www/html/index.html

# 备份目录挂载卷
VOLUME /var/www/html/zentaopms/tmp/backup
代码说明
相比较原版,主要是安装的插件和进行一些初始设置
apt-get install -y --no-install-recommends libldap2-dev
docker-php-ext-configure ldap --with-libdir=lib/x86_64-linux-gnu/
docker-php-ext-install ldap
这些是运行 ldap 需要安装的环境组件和设置
touch ./www/ok.txt \
  && mkdir -p ./lib/ldap \
  && chmod 777 . \
  && chmod -R 777 ./lib/ldap
一些设置,ok.text 是禅道检测运行安装插件用的
下载并解压插件
# LDAP 插件
RUN curl -o ./module/extension/ext/ldap-master.zip https://codeload.github.com/iboxpay/ldap/zip/master \
  && unzip ./module/extension/ext/ldap-master.zip -d ./module/extension/ext/ \
  && mv ./module/extension/ext/ldap-master ./module/extension/ext/ldap \
  && cp -r ./module/extension/ext/ldap/lib/* ./lib/ \
  && cp -r ./module/extension/ext/ldap/module/* ./module/ \
  && mkdir -p ./tmp/extension/ \
  && mv ./module/extension/ext/ldap-master.zip ./tmp/extension/ldap.zip
这个和官方安装插件的方式不太一样,官方推荐的插件安装方式是在启动后到后台选择安装;这里只是把插件下载后直接解压到插件对应的目录生效,效果一样,但是相对来说设置简单些。禅道用控制台安装插件大致做了这些操作:
- 插件不解压存放在:tmp/extension 目录
- 完整解压放在:/module/extension/ext 目录下子目录 ldap
- 插件中 lib, module 目录复制到项目根目录 lib, module 目录
- 往数据库表
zt_extension中
上面的实现了 1~3,没有往数据库中插入,所以是不会在插件列表中看到插件,没法进行设置的
运行容器
docker run -d --name zentao -p :80 \
  -e VIRTUAL_HOST=zentao.wilmartest.cn \
  yinguowei/zentao:ldap
启动后设置 ldap
启动后还需要设置三个文件,参考 禅道开源版ldap配置
-
修改:module/user/ext/config/ldap.php 里关于 ldap 服务器地址和认证的配置,如:
$config->ldap->ldap_server = 'ldap://10.229.253.35:3268'; $config->ldap->ldap_protocol_version = 3; $config->ldap->ldap_follow_referrals = 0; $config->ldap->ldap_root_dn = 'dc=wilmar,dc=cn'; $config->ldap->ldap_uid_field = 'sAMAccountName'; $config->ldap->ldap_bind_dn = 'yourdn@wilmar.cn'; $config->ldap->ldap_bind_passwd = 'yourpassword'; $config->ldap->ldap_organization = '(objectCategory=person)(!(userAccountControl:1.2.840.113556.1.4.803:=2))'; -
禅道登录时输入的密码会在js里加密(md5(md5(密码+随机数))),这样在ldap_bind()中是不知道随机数是多少的,所以会认证失败。所以要跳过加密:/module/user/js/login.js
if(password.length != 32 && typeof(md5) == 'function') $('input:password').val(password); -
修改ldap_bind()参数
和ldap参数配置里面的一样,bind_dn的格式为user@domain,而ldap拿到的不是这种格式,所以需要修改一下文件: lib/ldap/ldap.class.php
 # Attempt to bind with the DN and password
 $name = $t_info[$i]['samaccountname'][0];
 // if ( @ldap_bind( $t_ds, $t_dn, $p_password ) ) {
 if ( @ldap_bind( $t_ds, "{$name}@wilmar.cn", $p_password ) ) {
   $t_authenticated = true;
   break;
 }
容器内不可以编辑文件的话,把文件在外面编辑好拷贝进去
docker cp ldap.class.php zentao:/var/www/html/zentaopms/lib/ldap/ldap.class.php
docker cp login.js zentao:/var/www/html/zentaopms/module/user/js/login.js
docker cp ldap.php zentao:/var/www/html/zentaopms/module/user/ext/config/ldap.php
注意这些文件修改的时候都不要直接在进行内修改,尽量将修改过程脚本化下来,后面章节还会介绍用 sed 命令,且不要把自己公司的账号地址发布到镜像中去
重启下 apache ,在容器内 service apache2 restart ,会自动把容器停掉,然后重启容器就行了 docker start zentao(也有可能不需要这步重启)
接下来就可以用 ldap 后 AD 用户登入,以及 admin 用户本地登入了。
可配置化
上面的做法是把配置文件在外面设置好拷贝覆盖,但是按照十二范式的推荐,首先过程没有脚本,其次代码不可幂等,还是建议将配置参数化并自动写入配置文件
一共新增以下环境变量(等号右边的既是默认值)
export LDAP_HOST=10.229.253.36
export LDAP_PORT=389
export LDAP_ROOT_DN=dc=wilmar,dc=cn
export LDAP_UID_FIELD=sAMAccountName
export LDAP_BIND_DN=yourdn@wilmar.cn
export LDAP_BIND_PASSWORD=yourpassword
export LDAP_DOAMIN=wilmar.cn
Dockerfile 里设置
ENV LDAP_HOST=10.229.253.36
ENV LDAP_PORT=389
ENV LDAP_ROOT_DN=dc=wilmar,dc=cn
ENV LDAP_UID_FIELD=sAMAccountName
ENV LDAP_BIND_DN=yourdn@wilmar.cn
ENV LDAP_BIND_PASSWORD=yourpassword
ENV LDAP_DOMAIN=wilmar.cn
一开始尝试将环境变量值写到 PHP,后来发现 RUN 命令是在镜像编译时写进去的环境变量默认值,所以要改成在 PHP 内获取环境变量
(以下是环境变量值写入,作废)
sed -i 's/^\$config->ldap->ldap_server.*$/\$config->ldap->ldap_server = '\''ldap:\/\/'$LDAP_HOST':'$LDAP_PORT\'';/' ldap.php
sed -i 's/^\$config->ldap->ldap_root_dn.*$/\$config->ldap->ldap_root_dn = '\'$LDAP_ROOT_DN\'';/' ldap.php
sed -i 's/^\$config->ldap->ldap_uid_field.*$/\$config->ldap->ldap_uid_field = '\'$LDAP_UID_FIELD\'';/' ldap.php
sed -i 's/^\$config->ldap->ldap_bind_dn.*$/\$config->ldap->ldap_bind_dn = '\'$LDAP_BIND_DN\'';/' ldap.php
sed -i 's/^\$config->ldap->ldap_bind_passwd.*$/\$config->ldap->ldap_bind_passwd = '\'$LDAP_BIND_PASSWORD\'';/' ldap.php
sed -i 's/#\$config->ldap->ldap_organization/\$config->ldap->ldap_organization/' ldap.php
注:最后一行是默认启用只检测激活用户,不需要可以手动注释掉
Dockerfile 里三个文件的更新写法:
# ldap.php
RUN sed -i 's/^\$config->ldap->ldap_server.*$/\$config->ldap->ldap_server = '\''ldap:\/\/'\'' \. getenv('\''LDAP_HOST'\'') \. '\'':'\'' \. getenv('\''LDAP_PORT'\'');/' module/user/ext/config/ldap.php \
  && sed -i 's/^\$config->ldap->ldap_root_dn.*$/\$config->ldap->ldap_root_dn = getenv('\''LDAP_ROOT_DN'\'');/' module/user/ext/config/ldap.php \
  && sed -i 's/^\$config->ldap->ldap_uid_field.*$/\$config->ldap->ldap_uid_field = getenv('\''LDAP_UID_FIELD'\'');/' module/user/ext/config/ldap.php \
  && sed -i 's/^\$config->ldap->ldap_bind_dn.*$/\$config->ldap->ldap_bind_dn = getenv('\''LDAP_BIND_DN'\'');/' module/user/ext/config/ldap.php \
  && sed -i 's/^\$config->ldap->ldap_bind_passwd.*$/\$config->ldap->ldap_bind_passwd = getenv('\''LDAP_BIND_PASSWORD'\'');/' module/user/ext/config/ldap.php \
  && sed -i 's/#\$config->ldap->ldap_organization/\$config->ldap->ldap_organization/' module/user/ext/config/ldap.php

# login.js
RUN sed -i 's/md5(md5(password) + rand)/password/' module/user/js/login.js

# ldap.class.php
# $t_dn = $t_info[$i]['dn']; 改为:  $t_dn = "{$t_info[$i]['samaccountname'][0]}@{$_ENV['LDAP_DOMAIN']}";
RUN sed -i 's/$t_dn =.*$/$t_dn = $t_info[$i]['\''samaccountname'\''][0] . "@" . $_ENV['\''LDAP_DOMAIN'\''];/' lib/ldap/ldap.class.php
注意几点
- sed 里表达式中特殊字符需要转义,如 \/ . $
- 有个特殊的单引号要放到字符串外面再用 ' 转义,所以看上去是 ‘'’
- 变量可以在外面用 $ 引用
- 字符串拼接用 . 或者
"{$xxx}"方式获取变量 - 环境变量用
getenv('xxx')或者_EVN['xxx']获取,不能用$_SERVER['xxx']
用参数运行例子:
docker run -d -p 8080:80 --name=zentao -e LDAP_BIND_DN=yourdn@wilmar.cn -e LDAP_BIND_PASSWORD=yourpassword yinguowei/zentao:ldap
完整的例子
docker run -d -p 8080:80 --name=zentao \
  -e LDAP_HOST=10.229.253.36 \
  -e LDAP_PORT=389 \
  -e LDAP_ROOT_DN=dc=wilmar,dc=cn \
  -e LDAP_UID_FIELD=sAMAccountName \
  -e LDAP_BIND_DN=yourdn@wilmar.cn \
  -e LDAP_BIND_PASSWORD=yourpassword \
  yinguowei/zentao:ldap
插件缺陷
最后,这个 ldap 并没有做到完善,还存在以下几个问题
- 只做了登入验证,在系统内其他管理功能当需要输入管理密码的时候,如果管理员是 AD 用户,这时候是不会用设置的 AD 认证的,还是初始化用户的那个管理员密码,可以勉强适用,比如管理员建议保留原来的 admin(用户名不要改),或者个别 AD 账号设置管理员,同时用管理设置其在禅道内账号的密码和 AD 一致
- 没有界面配置,毕竟免费的
- 不支持多域
- 首先需要把客户端加密的代码去掉,对 AD 用户影响不大,数据库用户不安全,建议不要用
- domain 的地址除了配置还需要写到 ldap_bind() 函数里,代码和配置渗透
用 ECS 运行容器
很简单,基本就是把 Dockerfile 往 ECS 推
Docker Swarm 管理集群
TBD
JHipster v5.0.0 正式发布
JHipster v5.0.0 正式发布
(译者:2018 年 6 月 20 日,JHipster 5.0 在经历了近一年的准备后终于正式 release 了,之前几个月几个大佬 Julien,Deepu,Matt,以及新加入的 Christophe,一直在不断定蓝图、编码、步道,终于在经过了 4 个 beta 版本后正式发布了,以下为 JHipster 中文化站的引用,原译文请访问,官网)
JHipster 5 第一个稳定版正式发布了!
下面是我们 JHipster 5.0.0 前 4 个 beta 版本的 release notes。
前端
- 支持了 React #6044 (已经不是实验性特性了)
- 同样支持了 Angular 的特性 (包括下面提到的对话框和目录结构)
- 使用 Redux 做状态管理
- 使用 React Router v4 做路由
- 使用 Typescript
- 使用 Webpack 4 编译,和之前的 Angular 设置类似
- Jest + Mocha + Chai 单元测试以及极高测试覆盖率
- 增强了 Angular 支持
- 升级到 Angular 6,感谢 William Marques in #7582
- 包含迁移到 Webpack 4, 带来更佳的性能表现 (it varies depending on your situation, but you can expect a noticeable positive impact) #7186
- admin 模块延迟加载 #7235
- 重新设计了实体的 创建/编辑 页面,它们现在是普通页面而不再是弹出页面了 #7368
- 优化了 AOT (Ahead of Time,预编译)技术
- 实体对象的目录结构改进了,尤其是微服务目前根据服务分组了。增加了个
--skip-ui-grouping标志来保留原来的结构 #7079
- 使 Webpack 4 同时支持 Angular 和 React,编译更快。
- 支持了 Jest ,替代了原来的 Puppeteer (以及 PhantomJS) ,Angular 和 React 都将安装和测试得更快 (以及并行测试)。这同时解决了 CI 做前端测试时的一些问题 (尤其是和 Jenkins 一起使用时),不再需要本地包安装。参考 #7636 and #7663 from William Marques.
- 支持了 Prettier #6906
- 更新到 Font Awesome 5 #7516.
- 移除了 AngularJS
- 目前我们关注在 Angular 5+ 了,我们已经移除了老的 AngularJS 1.x 支持
- 连带的移除了 Bower 和 Gulp 支持
后端
- 支持了 Spring Boot 2.0.0 #7061
- 所有的 Spring 组件都更新了,包括 Spring Data, Spring Security 和 Spring Cloud
- Spring Boot 的相关设置也更新了
- 概述了 REST 支持,删除了用注解
@PutMapping来创建实体 #7425. - 更好地支持了 OAuth2,感谢 Fabien Arrault ,由 Matt Raible 集成。参考 #7666.
- 迁移了 swagger-codegen 到 openapi-generator (新组件是 swagger-codegen 的社区分支) 由 Christophe Bornet 支持,他也是 JHipster 核心组成员以及 openapi-generator 团队成员。参考 #7728.
- 支持了 Memcached,作为 Spring Cache 实现的一个可选项。这个在 Heroku, GCP and AWS 等平台上使用比用 Ehcache/Hazelcast/Infinispan 更方便。
子命令和工具
子命令(Sub-generators)
- JDL v2 支持了创建应用 #7339
- 所以语言也进化了,现在可以通过 JDL 来创建引用了,而不只是实体对象。这对于希望分享和重用 JHipster 配置的场景来说是个大消息。
- 新的 JHipster 蓝图(blueprints)
- 蓝图系统使得扩展或替换 JHipster 模板更方便了,新的 JHipster Kotlin 工作于此。目前文档还没有完整,但是 JHipster Kotlin 已经给出了例子。
- 新的之命令(Sub-generator)来发布到 AWS 容器 #7035
- 初级的 Istio 支持 #7337,#7695 由 Google 的 Ray Tsang 增加,以及 #7697 by Srinivasa Vasu. 以及 Pierre Besson.
- 支持了 Google App Engine 上部署 monoliths,由 Google 的 Ray Tsang 提供,参考 #7765.
所有的 ticket 以及 PR
PR (pull requests)
如何更新
自动更新
自动更新参考 JHipster upgrade sub-generator,在一个已有项目上:
升级 JHipster 版本:
yarn global upgrade generator-jhipster
运行之命令:
jhipster upgrade
手动升级
要手动升级,首先升级 JHipster 版本:
yarn global upgrade generator-jhipster
如果已有项目,还继续使用原来的 JHipster 版本。
要升级项目,首先删除 node_modules 目录,然后运行:
jhipster
也可以升级整个项目以及实体对象:
jhipster --with-entities
也可以一个个升级实体对象,比如升级对象 Foo
jhipster entity Foo
帮助和问题
如果发现此版本的问题,请:
- 提交 Issue bug tracker
- 提问在 Stack Overflow
如果是一个非常紧急或安全问题,请:
- 联系 @java_hipster on Twitter
用 starred 生成 GitHub star 的 Awesome List
用 starred 生成 GitHub star 的 Awesome List
当自己的 GitHub 上的 star 太多的时候,在想是不是可以做一个自己的 awesome list,就从自己的 starred 页面 Your Stars 爬一下,上 GitHub 一搜,果然有:maguowei/starred ,不过原理是用的 GitHub API
需要 Python 和 PIP
略
安装 starred
sudo pip install starred
执行时如果报错 /usr/bin/xdg-open: 775: /usr/bin/xdg-open: www-browser: not found ,安装 xdg-utils
sudo apt-get install xdg-utils --fix-missing
安装完毕后,开始用 starred 生成 awesome list:
两种方式生成 Awesome List
1. 直接生成文件
starred --username yingw --sort > README.md
就直接生成了一个包含了 https://github.com/yingw/my-stars 所有 star 的仓库名称、介绍、地址的 README.md 文件,再手动提交这个文件到一个自己的新仓库中就好了。
2. 生成到 GitHub 仓库
去 GitHub 生成 Token ,选了 repo 权限,把生成的 Token 放到下面命令里去:
export GITHUB_TOKEN=[your-generated-token]
starred --username yingw --repository my-stars --sort
第一次只会生成仓库,不会提交 README.md(可能是没有 git init),手动提交一下就是了。之后只需要执行就可以自动提交更新了。
最后,我的 my-stars
CAS 集成 SAML 2.0
CAS 集成 SAML 2.0
最近在和另一个 Team 做 CAS 集成对方 SAML 协议的单点登入。遇到点坑,就记录了下来。
CAS 协议
CAS 支持客户端接入的协议非常多,有 CAS, SAML, WS-Federation, OAuth2, OpenID, OpenID Connect, REST。这之前公司的 CAS5 已经开发了 CAS 和 Rest 协议,也在考虑 ADFS 接入。SAML 是第一次尝试。
SAML
SAML(这里都是指 SAML 2.0 版本)的介绍网上很多,可以看简书的一篇介绍以及它里面的链接。
CAS 集成 SAML
CAS 支持 SAML 的集成非常简单,根据官网 SAML2 Authentication 的说明如果不考虑各种优化(如数据库存储、安全认证),只需要加上一个 maven 的依赖就行了:
<dependency>
  <groupId>org.apereo.cas</groupId>
  <artifactId>cas-server-support-saml-idp</artifactId>
  <version>${cas.version}</version>
</dependency>
启动后访问:
https://cas.example.org:8443/cas/idp/metadata
就能得到 SAML 接入的 metadata,以及各种 URL 地址了。在 /etc/cas/saml 下能得到这个 metadata 的 xml 定义文件,以及各证书(目前尚不清楚 idp-encryption.crt 和 idp-signing.crt 分别的作用,以及 cas 的证书和客户端的证书,待测试)。
SAML error
但是事情没有那么简单。如果启用了 SAML 模块,同时又启用了 JPA Service Registry,会在启动时报一个 SQL 语法错误。
Hibernate: create table SamlRegisteredService_AttributeNameFormats (SamlRegisteredService_id bigint not null, value varchar(255), key varchar(255) not null, primary key (SamlRegisteredService_id, key)) engine=MyISAM
Hibernate: alter table RegisteredServiceImpl_Props add constraint UK_i2mjaqjwxpvurc6aefjkx5x97 unique (properties_id)
2018-06-07 09:52:42,293 WARN [org.hibernate.tool.schema.internal.ExceptionHandlerLoggedImpl] - <GenerationTarget encountered exception accepting command : Error executing DDL via JDBC Statement>
org.hibernate.tool.schema.spi.CommandAcceptanceException: Error executing DDL via JDBC Statement
如果后台不打印 SQL,可能是设置了 showSql=false,打开 showSql 调试(默认就是打开的)
cas:
  jdbc:
    showSql: true
大致意思是创建 Saml 的服务注册相关表的时候遇到语法错误,错在有些字段名为 key,value,是 MySQL 的关键字,不能直接 SQL 里这么写,要加上反引号 ` ,方法就是在 Service Registry 的相关配置(文件 application.yml)里面加上:
cas:
  serviceRegistry:
    jpa:
      properties:
        hibernate:
          globally_quoted_identifiers: true
题外话,一般 Hibernate 配置:
hibernate.globally_quoted_identifiers=true
Spring Boot 使用 Hibernate 是加在:
spring:
  jpa:
    properties:
      hibernate:
        globally_quoted_identifiers: true
再重启语句就被翻译成
create table SamlRegisteredService_AttributeNameFormats (SamlRegisteredService_id bigint not null, `value` varchar(255), `key` varchar(255) not null, primary key (SamlRegisteredService_id, `key`)) engine=MyISAM
就顺利执行没有报错了。
另一个小坑
想着把其他模块:Ticket、Audit 的相关 JPA 设置都加上这个反引号以防万一:
cas:
  ticket:
    registry:
      jpa:
        properties:
          hibernate:
            globally_quoted_identifiers: true
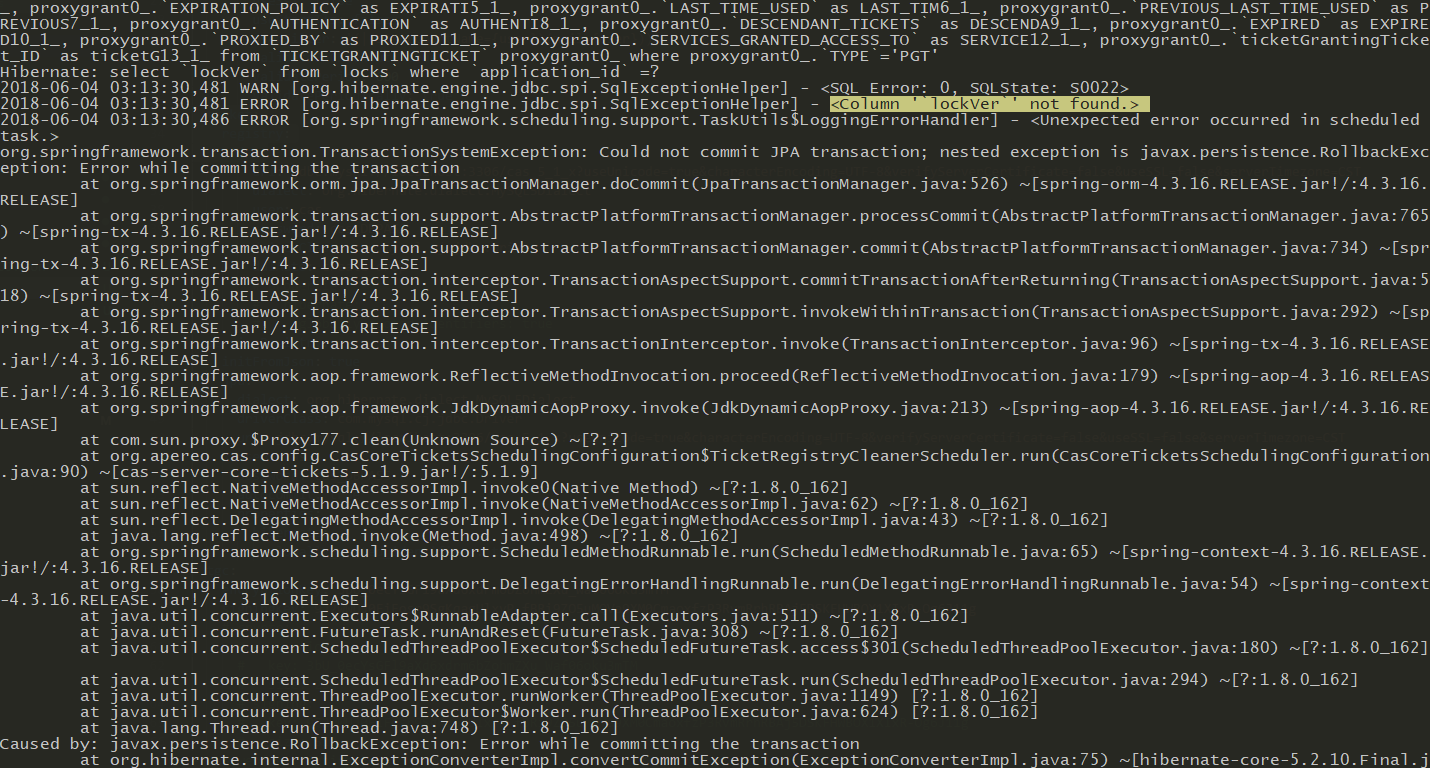
却发现加了反而会报错,会在 Lock 表上有个报错:找不到 lockVer 字段,所以不能加。
另一个建议
把 MySQL 的驱动升级到 6.0.6,驱动类使用 driverClass: com.mysql.cj.jdbc.Driver,原来是 com.mysql.jdbc.Driver
<!-- MySQl JDBC Driver -->
<dependency>
  <groupId>mysql</groupId>
  <artifactId>mysql-connector-java</artifactId>
  <version>6.0.6</version>
</dependency>
另一个建议2
MySQL 数据库名称标准是不能含中划线 - 的,但是用一些工具如 DBeaver 是会加上反引号加出来,会导致一些 SQL 报错,建议数据库名只用英文、数字、和下划线,不要用中划线。
jdbc:mysql://localhost:3306/cas_5_1_x?useUnicode=true&characterEncoding=UTF-8&verifyServerCertificate=false&useSSL=false&serverTimezone=CST
参考文档
- Ariba (Procurement) (IdP-initiated) Integration Guide
- Ariba SAML 2.0 Integration
- Configure SSO from Salesforce to WebEx
- Configuring SAML for Ariba
- Remote Authentication for Ariba On Demand:Ariba Invoice White Paper.qxd.qxd
- SAML 验证方面的常见问题
CAS 文档
用 Jekyll 搭建个人博客
用 Jekyll 搭建个人博客
一直计划用 Github Pages 和 Jekyll 搭建个人博客,把之前散在各博客:CSDN、ITEYE、博客园,以及自己各种笔记软件里的文章都迁移过来。直到最近做了个基于 Jekyll 的网站的翻译工作有了点基础。遂走起——
注:整个建站过程需要用到以下工具或组件
安装 Ruby 环境
首先,Jekyll 是基于 Ruby 开发的,需要 Ruby 开发环境。根据官网的说法,Linux 和 Mac 直接用系统的包管理工具就可以安装 Ruby。Windows 的 Ruby 需要使用 RubyInstaller 来安装。
RubyInstaller
前往 https://rubyinstaller.org/downloads/ 下载 RubyInstaller 并安装
注:需要 Ruby 2.1.0 以上版本
安装完成后检测一下 Ruby 是否正确安装及版本:
ruby -v
安装 RubyGems
Ruby 1.9.2 以上版本已经默认安装了RubyGems,就不需要再手动安装了。
注:需要 RubyGems 2.6 以上
检查版本:
gem -v
切换 Ruby 的国内源
虽然不用安装 RubyGems 了,但是在后续使用前建议把下载 Gem 的源切换为国内的 Gem 源,这里用的是 ruby-china 的源:
gem sources --add https://gems.ruby-china.org/ --remove https://rubygems.org/
查看源
gem sources -l
安装 Bundle
gem install bundle
安装 Jekyll
gem install jekyll
Jekyll Themes 模板
前往 Jekyll Themes 选一个想用的模板。clone 该模板的项目或者下载 zip 解压直接使用。比如这里我选了个 TeXt 模板:

git clone https://github.com/kitian616/jekyll-TeXt-theme.git
官网说了有
普通安装和主题安装两种方式,这里介绍的是简单的普通安装,后续会介绍更灵活的主题安装。
其他优秀模板
- https://gaohaoyang.github.io/
- http://jekyllthemes.org/themes/jekyll-theme-next/
- http://jekyllthemes.org/themes/simple-elegant/
- https://github.com/iissnan/hexo-theme-next
安装 Gem 依赖
下载或克隆成功后,直接启动会有报错缺失 gem,先安装各依赖 Gem,进入项目目录:
bundle install
启动 Jekyll Server
bundle exec jekyll serve
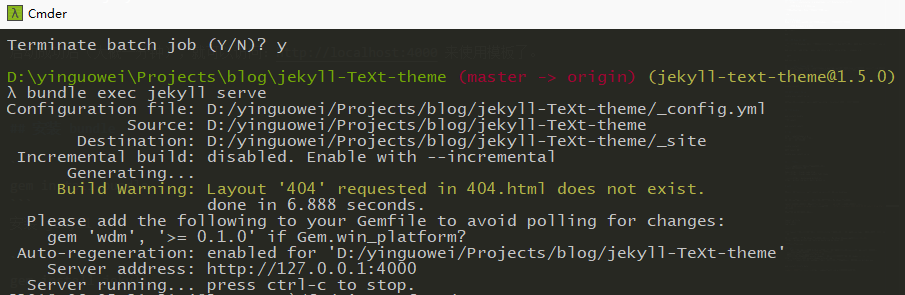 启动成功后(大概一分钟),就可以访问:http://localhost:4000 来使用模板了。
启动如果有报错字符集,那是因为 windows 的命令行工具默认字符集不是 UTF8,可以先执行
chcp 65001,再启动就可以chcp 65001 bundle exec jekyll serve
如果启动有报错
Permission denied - bind(2) for 127.0.0.1:4000,那是因为 4000 端口被什么程序使用了,使用 netstat 找出是哪个进程占用了端口,关闭应用或杀掉进程:# 找到进程 PID netstat -aon|findstr "4000" # 假设上面命令找到的 PID 是 207216 tasklist|findstr "207216" # 得知是什么进程后可以关闭程序或者杀掉进程 taskkill /PID 207216后面两步也可以用任务管理器来定位 PID 和结束进程。 我这里是被 FoxitReader 的一个保护进程占用了,查一下,杀掉 FoxitProtect 进程。
TeXt 的一些设置
有关 TeXt 模板,作者已经在 GitHub 上写了很详细的中英文使用教程,我就简单提一下我用到的重点:
- 大部分配置信息都可以在
_config.yml里面修改(但注意 _config 的内容改变后不会立即生效,需要重启 Jekyll) - 可以删掉
test、screenshots、docs目录 - 需要引用的图片可以放在
assets/images/目录下,引用的时候如:http://localhost:4000/assets/images/octocat.jpg _site是 Jekyll 运行时生成的网站代码,不要修改了这里的网页或者提交它们(已 gitignore)- 可以设置 LeanCloud(看 TeXt 文档) 来使用点击量统计功能(注意要使用点击统计功能的话,md 文件头部的 key 字段不可省略)
- 可以设置 Gitalk 来使用留言
- 如果设置了时区启动报错,可以去
Gemfile里把那句注释掉的gem 'tzinfo-data', platforms: [:mingw, :mswin, :x64_mingw]释放出来,重新bundle install运行就行了 - 如上面截图,还有个 404 模板没找到的警告,暂时不知为何
开始写文章
接下来就可以使用模板并书写自己的文章了:
- 在根目录下新建一个
_post目录, - 然后就在里面添加 MarkDown 格式的文章
Jekyll 要求文章的文件名格式都是:
年-月-日-标题.md,比如这篇文章的文件名为:2018-06-05-jekyll-blog.md,将来就会自动发布到http://localhost:4000/2018/06/05/jekyll-blog.htmlURL 上。 - 在新建的 md 文件内最顶部添加内容:
---
layout: article
title: 文章标题
tag: jekyll
key: 20180605_jekyll_blog
---
这一段是必要的,其中
layout是文章使用的模板,不用修改,title是指文章的标题。还可以加上tags来给文章设定标签用来分类检索(多个关键字用英文的空格分隔)。
再往下就可以开始写 MarkDown 格式的文章了,有关 MarkDown 的语法,可以参考这篇教程。
Jekyll 在运行过程中是实时同步网页的变更的,只要保存了 md 文件,就会自动在 _site 生成 html(注意看 Jekyll 的控制台 Log),所以保存好之后过个几秒,就可以看到效果了。
至此,本地的开发环境已经准备好了,就可以本地边编写边查看网站效果了,下面要把网站提交到 GitHub Pages 上去。
图片的相对路径
前面提到,图片存放的位置和访问的路径。但是为了之后同时在网站、GitHub 代码库、其他笔记中访问都能得到正确的图片路径(之前的相对路径可以满足前两个,但是外部笔记就没有相对路径的目录),可以把图片的相对路径改为发布到 GitHub 后的代码库路径,比如:

改为

提交 GitHub Pages
首先创建一个名为 yourname.github.io 的新的仓库,再将所有代码和自己创建的 _posts 都提交过去就好了。具体怎么提交就不细说了,大致:
git init
git add .
git commit -m "first commit"
git remote add origin https://github.com/yingw/yingw.github.io.git
git push -u origin master
进入仓库的 Setting 查看一下 GitHub Pages 的设置是否已经在生成了。全部完成后访问:https://yourname.github.io,就能在线访问我们的博客了。
到这里开发和在线环境都已经配置好了,后续要做的就是坚持每天在 _posts 里面写新的文章并推送到 GitHub,一两分钟后就生效可以查看了。
域名绑定(可选)
如果有个人域名,或者不想用 *.github.io 这个域名,还可以自己申请一个并通过设置 CNAME 来跳转到 GitHub Pages 托管的网站上。
申请域名
可以用些免费的二三级域名,也可以花钱去阿里云申请一个:https://wanwang.aliyun.com/domain
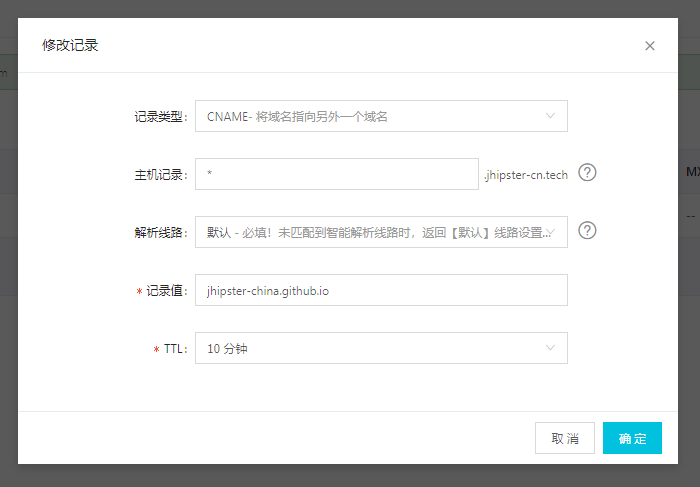
各种付款、审计通过后,在域名服务管理域名:https://dc.console.aliyun.com/next/index#/domain/list/all-domain,点“解析” 进入 “解析设置”,添加一条解析设置:
- “记录类型” 为 “CNAME”
- “主机记录” 设置为 *
- “记录值” 就是 GitHub 的 yourname.github.io 域名
最后回到我们的项目代码中,在根目录创建一个 CNAME 文件,文件内容就是一行上面申请的域名,来告诉 GitHub 运行这个域名引来的访问可以访问我们的空间。提交该文件。过一会等 GitHub Pages 编译好,就可以通过我们自己的域名访问博客了。
参考文章
UReport 的缓存设置
UReport 的缓存设置
描述
默认情况下,UReport 有设置 HTTPSession 来缓存报表,并且还有个内置的内存缓存来缓存报表定义。
注意这是两种缓存:
com.bstek.ureport.cache.ReportCache缓存的内容是报表,包括报表的数据、图表com.bstek.ureport.cache.ReportDefinitionCache缓存的是报表的设计
默认情况下,有一个 com.bstek.ureport.console.cache.HttpSessionReportCache 来缓存报表;另一个 com.bstek.ureport.cache.DefaultMemoryReportDefinitionCache 来缓存报表定义。(不知道为什么不放到一起)
出现问题的场景
在少量设计场景中,需要直接从文件或数据库中修改报表定义的 xml 内容来做到一些高级设计,就会发现虽然文件和数据库内容已经改了,但是报表的预览还是原来的,这就是因为报表定义的缓存没有更新。
UReport 只提供了在线正常读、更新缓存,但是没有清除缓存的接口。
禁用报表缓存
之前看到有设置
<bean id="ureport.httpSessionReportCache" class="com.bstek.ureport.console.cache.HttpSessionReportCache">
	<property name="disabled" value="${ureport.disableHttpSessionReportCache}"></property>
</bean>
于是可以在 config.properties 里面设置 ureport.disableHttpSessionReportCache=true 来禁用报表缓存,但是 UReport 有个小 bug(已修复)。
更新到 2.2.8(2018-05-27)后就可以正常使用这个设置。
但是对数据库的缓存更新还是没作用,原因就是还有个报表定义的缓存没有清除
禁用报表定义缓存
参考 com.bstek.ureport.cache.CacheUtils#setApplicationContext 内的写法,可以发现是有个 ReportDefinitionCache 接口实现,并默认拿第一个做报表定义缓存,如果一个实现都没有的话,会生成下面的 DefaultMemoryReportDefinitionCache 来做缓存。
遂复写 DefaultMemoryReportDefinitionCache,加上一个可以清除的接口,通过 post 请求 /clearCache 调用就行了
ErasableMemoryCache
/**
 * 类似 DefaultMemoryReportDefinitionCache,增加 clearCache 方法来清除缓存,用于在后台改了报表没法立即生效的场景。
 * 至于初始化这个和 DefaultMemoryReportDefinitionCache 的关系,参考 com.bstek.ureport.cache.CacheUtils#setApplicationContext
 * @author Yin Guo Wei 2018/5/27.
 */
@Component
public class ErasableMemoryCache implements ReportDefinitionCache {

    private Map<String, ReportDefinition> reportMap = new ConcurrentHashMap<String, ReportDefinition>();

    /**
     * 清除缓存
     */
    public void clearCache() {
        this.reportMap.clear();
    }

    @Override
    public ReportDefinition getReportDefinition(String file) {
        return reportMap.get(file);
    }

    @Override
    public void cacheReportDefinition(String file, ReportDefinition reportDefinition) {
        if (reportMap.containsKey(file)) {
            reportMap.remove(file);
        }
        reportMap.put(file, reportDefinition);
    }
}
CacheController
web 层入口
/**
 * 接收前端发来 post 指令清除缓存
 * @author Yin Guo Wei 2018/5/27.
 */
@Controller
public class CacheController {

    private final ErasableMemoryCache erasableMemoryCache;

    public CacheController(ErasableMemoryCache erasableMemoryCache) {
        this.erasableMemoryCache = erasableMemoryCache;
    }

    /**
     * 清除缓存的入口
     * @return 返回首页
     */
    @PostMapping("/clearCache")
    public String clearCache() {
        erasableMemoryCache.clearCache();
        return "redirect:/reports";
    }
}
NullCache
同时如果想完全不用缓存,还定义了一个 NullCache,但是不建议使用,只适合于开发环境
/**
 * 完全不适用 Cache,建议不开启。如果需要开启,加上类上注解 @Component。
 * (建议使用 ErasableMemoryCache)
 * @author Yin Guo Wei 2018/5/27.
 */
//@Component
public class NullCache implements ReportDefinitionCache {
    @Override
    public ReportDefinition getReportDefinition(String file) {
        System.out.println("NullCache.getReportDefinition");
        System.out.println("file = " + file);
        return null;
    }

    @Override
    public void cacheReportDefinition(String file, ReportDefinition reportDefinition) {
        System.out.println("NullCache.cacheReportDefinition");
    }
}
注意 NullCache 和 ErasableMemoryCache 只能定义一个 Component,原因是 Java 反射返回的实现没有排序,UReport 只取了 getBeansOfType(ReportDefinitionCache.class) 的第一个。(当然也可以用 @Order 来排序)
测试
用 postman 提交 post 请求:http://localhost:8080/clearCache ,观察多次打开后台的 log 以及断点,测试通过,开关生效。
最后:不高兴在 Reports 页面放一个提交按钮到 clearCache 请求。
其他类参考
一些断点的地方
- com.bstek.ureport.cache.CacheUtils#getReportDefinition
- com.bstek.ureport.console.designer.DesignerServletAction#loadReport
- com.bstek.ureport.console.designer.DesignerServletAction#deleteReportFile
- com.bstek.ureport.console.cache.HttpSessionReportCache
- com.bstek.ureport.cache.DefaultMemoryReportDefinitionCache
Demo 项目地址 https://github.com/yingw/ureport-demo
Service 层缓存
Service 层缓存
应用中缓存对于提升应用整体性能的作用很大,我们会在很多地方用到,如浏览器缓存、数据缓存、服务层缓存,缓存的内容也有计数器、短信、常用的数据查询,越能提供更大、更稳健的分布式缓存、提升缓存命中率,对应用的运行帮助也越大。
本篇介绍的是在 Spring Boot 项目中如何集成多种缓存并简化开发的过程,在 service 层使用了数据库缓存做例子,以及 EhCache 和 Redis 作为缓存服务。
目录
集成 Cache
首先将应用和 Cache 集成,非常方便:
基础配置
- 添加依赖
<dependency>
	<groupId>org.springframework.boot</groupId>
	<artifactId>spring-boot-starter-cache</artifactId>
</dependency>
- 在主应用类 DemoApplication 上声明
@EnableCaching开启缓存
支持的缓存服务
接下来添加缓存 Provider 来使用外部缓存,Spring Boot 目前(2018-04)支持这些 cache 实现
- Generic (自己定义 Cache 实现)
- JCache (JSR-107) (EhCache 3, Hazelcast, Infinispan, and others)
- EhCache 2.x
- Hazelcast
- Infinispan
- Couchbase
- Redis
- Caffeine (Guava 的升级)
- Simple (默认的 ConcurrentHashMap 实现)
注1:不配置任何 Cache Provider 默认使用内存中的
Concurrent Maps来管理缓存
注2:在开发期间如果需要临时禁用缓存,可以设置缓存类型属性为 none:
spring.cache.type=none
集成 EhCache2
EhCache2 是个 Java 进程内运行的缓存框架,使用相对简单但性能也不错,建议项目启动的时候先集成,注意 2 和 3 两个版本的集成不太一样。
- Spring Boot 集成 EhCache 非常简单,在
pom.xml中添加缓存的依赖:
<dependency>
	<groupId>net.sf.ehcache</groupId>
	<artifactId>ehcache</artifactId>
</dependency>
- application.properties 配置
# EhCache2
spring.cache.type=ehcache
spring.cache.ehcache.config=classpath:ehcache.xml
- EhCache 配置文件
ehcache.xml
<ehcache xmlns:xsi="http://www.w3.org/2001/XMLSchema-instance"
         xsi:noNamespaceSchemaLocation="http://ehcache.org/ehcache.xsd">
    <cache name="users"
           maxEntriesLocalHeap="200"
           timeToLiveSeconds="600">
    </cache>
    <cache name="userByLogin"
           maxEntriesLocalHeap="200"
           timeToLiveSeconds="600">
    </cache>
    <cache name="userById"
           maxEntriesLocalHeap="200"
           timeToLiveSeconds="600">
    </cache>
</ehcache>
这里定义了三个缓存对象:users、userByLogin、userById,后面会用到。
还可以配置默认缓存(可选):
<defaultCache
    maxEntriesLocalHeap="0"
    eternal="false"
    timeToIdleSeconds="1200"
    timeToLiveSeconds="1200">
    <!--<terracotta/>-->
</defaultCache>
- 监听(可选)
EhCache2 提供了 CacheEventListener 接口来开发监听缓存事件的方法,可以定义:
public class CustomerCacheEventListener implements CacheEventListener {
    @Override
    public void notifyElementRemoved(Ehcache ehcache, Element element) throws CacheException {
        log.info("cache removed. key = {}, value = {}", element.getObjectKey(), element.getObjectValue());
    }

    @Override
    public void notifyElementPut(Ehcache ehcache, Element element) throws CacheException {
        log.info("cache put. key = {}, value = {}", element.getObjectKey(), element.getObjectValue());
    }

    @Override
    public void notifyElementUpdated(Ehcache ehcache, Element element) throws CacheException {
        log.info("cache updated. key = {}, value = {}", element.getObjectKey(), element.getObjectValue());
    }

    @Override
    public void notifyElementExpired(Ehcache ehcache, Element element) {
        log.info("cache expired. key = {}, value = {}", element.getObjectKey(), element.getObjectValue());
    }

    @Override
    public void notifyElementEvicted(Ehcache ehcache, Element element) {
        log.info("cache evicted. key = {}, value = {}", element.getObjectKey(), element.getObjectValue());
    }

    @Override
    public void notifyRemoveAll(Ehcache ehcache) {
        log.info("all elements removed. cache name = {}", ehcache.getName());
    }

    @Override
    public Object clone() throws CloneNotSupportedException {
        throw new CloneNotSupportedException();
    }

    @Override
    public void dispose() {
        log.info("cache dispose.");
    }
}
Factory
public class CustomerCacheEventListenerFactory extends CacheEventListenerFactory {
    @Override
    public CacheEventListener createCacheEventListener(Properties properties) {
        return new CustomerCacheEventListener();
    }
}
然后在配置中应用 Factory
<cache name="users"
        maxEntriesLocalHeap="200"
        timeToLiveSeconds="600">
    <cacheEventListenerFactory class="cn.wilmar.eevee.config.cache.CustomerCacheEventListenerFactory" />
</cache>
集成 EhCache3
EhCache3 相比 EhCache2 更新更快,并且集成了 Terracotta 集群平台,但是有些功能未完全实现。集成 EhCache3 和 2 差不多:
- 修改依赖
pom.xml,增加 JCache 标准的依赖:
<dependency>
	<groupId>javax.cache</groupId>
	<artifactId>cache-api</artifactId>
</dependency>
<dependency>
	<groupId>org.ehcache</groupId>
	<artifactId>ehcache</artifactId>
</dependency>
- 配置文件
application.properties
spring.cache.type=jcache
spring.cache.jcache.config=classpath:ehcache3.xml
spring.cache.jcache.provider=org.ehcache.jsr107.EhcacheCachingProvider
- EhCache 配置文件
ehcache3.xml
<config xmlns='http://www.ehcache.org/v3'
        xmlns:xsi="http://www.w3.org/2001/XMLSchema-instance"
        xmlns:jsr107="http://www.ehcache.org/v3/jsr107"
        xsi:schemaLocation="http://www.ehcache.org/v3 http://www.ehcache.org/schema/ehcache-core-3.0.xsd
							http://www.ehcache.org/v3/jsr107 http://www.ehcache.org/schema/ehcache-107-ext-3.0.xsd">
    <cache alias="users">
        <expiry>
            <ttl unit="seconds">600</ttl>
        </expiry>
        <heap unit="entries">200</heap>
        <jsr107:mbeans enable-statistics="true"/>
    </cache>

    ...
</config>
JCache 是 JSC-107 Java 缓存规范。由于可能混有多种 Cache 类,Spring Boot 建议定义 config 和 provider 这两个属性
推荐设定 cache-template,添加 Listener
    <cache-template name="default">
        <expiry>
            <ttl>600</ttl>
        </expiry>
        <listeners>
            <listener>
                <class>cn.wilmar.eevee.config.cache.EhCache3EventLogger</class>
                <event-firing-mode>ASYNCHRONOUS</event-firing-mode>
                <event-ordering-mode>UNORDERED</event-ordering-mode>
                <events-to-fire-on>CREATED</events-to-fire-on>
                <events-to-fire-on>UPDATED</events-to-fire-on>
                <events-to-fire-on>EXPIRED</events-to-fire-on>
                <events-to-fire-on>REMOVED</events-to-fire-on>
                <events-to-fire-on>EVICTED</events-to-fire-on>
            </listener>
        </listeners>

        <resources>
            <heap>100</heap>
            <offheap unit="MB">10</offheap>
            <!--<disk persistent="true" unit="MB">20</disk>-->
        </resources>
        <jsr107:mbeans enable-statistics="true"/>
    </cache-template>
EhCache3 的 Listener(和 EhCache2 不同)
public class EhCache3EventLogger implements CacheEventListener {
    @Override
    public void onEvent(CacheEvent cacheEvent) {
        log.info("\nEvent: {} \nKey: {} \noldValue: {} \nnewValue: {}", cacheEvent.getType(), cacheEvent.getKey(), cacheEvent.getOldValue(), cacheEvent.getNewValue());
    }
}
集成 Redis
- 起 Redis 的服务:
docker run -d -p 6379:6379 --name redis redis
- 依赖
<dependency>
    <groupId>org.springframework.boot</groupId>
    <artifactId>spring-boot-starter-data-redis</artifactId>
</dependency>
- 配置
# Redis
spring.cache.type=redis
spring.redis.host=127.0.0.1
spring.redis.port=6379
spring.redis.database=0
spring.cache.cache-names=users, userByLogin, userById
spring.cache.redis.time-to-live=860400
数据缓存、登入session 已经都存储到 Redis 了,可以实现重启保持登入且各对象缓存保存着。但是还有个 spring security 的 persistent_login 的表存储的 Token,再看怎么保存。
除了自己构建,更建议使用云供应商提供的 Redis 服务
其他 provider
还有其他很多优秀的缓存服务,视不同使用场景谨慎选择,建议开发环境 EhCache2,生产 Redis
其他配置不一一介绍:
参考 spring-boot-sample-cache,用 profile 跑不同的 cache
开启 Hibernate 二级缓存
针对 EhCache、EhCache3、Redis,应用 Hibernate 不同的缓存设置依赖
<dependency>
    <groupId>org.hibernate</groupId>
    <artifactId>hibernate-ehcache</artifactId>
</dependency>

<dependency>
    <groupId>org.hibernate</groupId>
    <artifactId>hibernate-jcache</artifactId>
</dependency>

<dependency>
    <groupId>com.github.debop</groupId>
    <artifactId>hibernate-redis</artifactId>
    <version>2.3.2</version>
</dependency>
设置
spring.jpa.properties.hibernate.cache.use_query_cache=true
spring.jpa.properties.hibernate.cache.use_second_level_cache=true
spring.jpa.properties.hibernate.cache.use_structured_entries=true
spring.jpa.properties.hibernate.cache.region_prefix=hibernate_

# EhCache2
spring.jpa.properties.hibernate.cache.region.factory_class=org.hibernate.cache.ehcache.SingletonEhCacheRegionFactory
spring.jpa.properties.hibernate.cache.provider_configuration_file_resource_path=ehcache.xml

# EhCache3
spring.jpa.properties.hibernate.cache.region.factory_class=org.hibernate.cache.jcache.internal.JCacheRegionFactory
spring.jpa.properties.hibernate.cache.provider_configuration_file_resource_path=ehcache3.xml

# Redis
spring.jpa.properties.hibernate.cache.region.factory_class=org.hibernate.cache.redis.hibernate52.SingletonRedisRegionFactory
spring.jpa.properties.hibernate.cache.provider_configuration_file_resource_path=hibernate-redis.properties
这样就可以同时使用业务层缓存和 ORM 缓存了。
使用 Cache
集成了 Cache,接下来就是如何在开发中使用了,这里从几个关键的 Cache 使用操作注解说明开始
主要注解
@Cacheable
@CachePut
@CacheEvict
@Caching
@CacheConfig
- @Cacheable 方法或类上,表示可缓存,如果命中直接返回缓存不执行方法内容
- @CachePut 也是表示可缓存,但是内容总是执行的
- @CacheEvict 清除缓存
- @Caching 同时使用多个 Cache 注解
- @CacheConfig 统一配置 cacheNames
注:在 Service 和 Repository 里面都可以使用 Cache 的注解,只是如果使用了 JpaRepository 的话没有实现做不了细节的控制,建议在 Service 里面混合使用注解和 CacheManager
Cacheable
表示方法可缓存 @Cacheable
@Cacheable(USERS_ALL_CACHE)
public List<User> findAllUsers() {
需要 Key 的场景
@Cacheable(value = USER_BY_ID_CACHE, key = "#id")
@Transactional(readOnly = true)
public User getUserById(long id) {
key 上还可以加些常量前缀,用来区分在同一个缓存中不同类型,像这样:
@Cacheable(key = "'id:' + #id")
@Transactional(readOnly = true)
public User getUser(long id) {
key 的语法,支持:
''常量#变量名#p0代表第一个参数- map 获取 key:
#p0['id']
CacheEvict
删除所有缓存 @CacheEvict(allEntries = true)
目前新增、更新、删除操作,都可以全删除缓存,以保障所有缓存同步(或者用 key)
复杂一点的如:
@CacheEvict(value="shops:detail",key="'id:'+#p0['id']",condition="#p0['id']>0")
public Shop getById(Map<String, Object> param);
CachePut
@CachePut(value="shops:detail",key="'id:'+#p0['id']")
public Shop update(Map<String, Object> param);
大多数情况下还需要清除别的缓存,参考 Caching
Caching
需要进行多个操作同时声明可以用 @Caching 来组合,以下示例为:新增或修改对象时根据 id、username 更新缓存,并清除名为 USERS_ALL_CACHE 的缓存
@Caching(put = {
        @CachePut(cacheNames = USER_BY_ID_CACHE, key = "#user.id"),
        @CachePut(cacheNames = USER_BY_LOGIN_CACHE, key = "#user.username")},
        evict = {@CacheEvict(cacheNames = USERS_ALL_CACHE, allEntries = true)})
public User createOrUpdateUser(User user) {
注意 在注解上写 key 由于要用常量,不能应用
SimpleKey.EMPTY.toString(),只能evict allEntries
CacheManager
有些场景,方法参数里可能没有 Cache 的 key,就只能通过 CacheManager 手动处理:
cacheManager.getCache(USER_BY_ID_CACHE).evict(user.getId());
cacheManager.getCache(USER_BY_LOGIN_CACHE).evict(user.getUsername());
cacheManager.getCache(USERS_ALL_CACHE).clear();
内部实现可以转成内部 ConcurrentMapCache.getCache.getNativeCache() 进行查看
ConcurrentMapCache concurrentMapCache = (ConcurrentMapCache) cacheManager.getCache(USERS_ALL_CACHE);
System.out.println("cacheManager.getCache(USERS_ALL_CACHE) = " + cacheManager.getCache(USERS_ALL_CACHE));
System.out.println("concurrentMapCache.getNativeCache() = " + concurrentMapCache.getNativeCache());
在没有设置 key 的时候默认增加的是一个 SimpleKey.EMPTY 对象(之前的版本是 0)
所以对于只有一个对象存储的 Cache,evict 的时候既可以 clear(),也可以 evict(SimpleKey.EMPTY)
同步,单线程 @Cacheable(sync=true)
UserService 查询
@Service
public class UserService {

    // 基本的三个 cache:所有对象集合缓存、byId、ByKey
    private static final String USERS_ALL_CACHE = "users";
    private static final String USER_BY_ID_CACHE = "userById";
    private static final String USER_BY_LOGIN_CACHE = "userByLogin";

    private final UserMapper userMapper;
    private final CacheManager cacheManager;

    public UserService(UserMapper userMapper, CacheManager cacheManager) {
        this.userMapper = userMapper;
        this.cacheManager = cacheManager;
    }

    @Cacheable(USERS_ALL_CACHE)
    @Transactional(readOnly = true)
    public List<User> getAll() {
        return userMapper.selectAll();
    }
}
再改一下 UserController,就可以测试缓存了,访问 http://localhost:8080/users ,观察后台是否发起了新的查询,看缓存是否生效。
Cache 测试
Cache 的测试并不复杂,可以用 Rule Log 日志,也可以直接用 CacheMananger 查询判断缓存是否生效
@Test
public void findAll() {
    Cache cache = cacheManager.getCache(USERS_ALL_CACHE);
    assertThat(cache, notNullValue());
    cache.clear();

    List<User> users = userService.findAll();

    assertThat(Objects.requireNonNull(cache.get(SimpleKey.EMPTY)).get(), equalTo(users));
}
UserService 完整 CRUD 例子
这里的 UserMapper 是 DAO 层 MyBatis 的 mapper 提供的方法,当然也可以用 JPA 或者 Hibernate 来提供
// 查询所有,存入 cache: users
@Cacheable(USERS_ALL_CACHE)
@Transactional(readOnly = true)
public List<User> getAll() {
    return userMapper.selectAll();
}

// 新增保存,更新 byId 和 byUsername 的两个 cache,清空 users cache
@Caching(put = {
        @CachePut(cacheNames = USER_BY_ID_CACHE, key = "#user.id"),
        @CachePut(cacheNames = USER_BY_LOGIN_CACHE, key = "#user.username")},
        evict = {@CacheEvict(cacheNames = USERS_ALL_CACHE, allEntries = true)})
public User save(User user) {
    userMapper.insert(user);
    return user;
}

// 更新保存,同上
@Caching(put = {
        @CachePut(cacheNames = USER_BY_ID_CACHE, key = "#user.id"),
        @CachePut(cacheNames = USER_BY_LOGIN_CACHE, key = "#user.username")},
        evict = {@CacheEvict(cacheNames = USERS_ALL_CACHE, allEntries = true)})
public User update(User user) {
    userMapper.updateByPrimaryKey(user);
    return user;
}

// 根据 id 删除对象,手动调用 CacheManager 清空相关所有 cache,就是上面说的方法参数里面没有用来清空的 key 参数场景
public void delete(Long id) {
    User user = userMapper.selectByPrimaryKey(id);
    if (user == null) {
        return;
    }
    userMapper.deleteByPrimaryKey(user);
    cacheManager.getCache(USER_BY_ID_CACHE).evict(user.getId());
    cacheManager.getCache(USER_BY_LOGIN_CACHE).evict(user.getUsername());
    cacheManager.getCache(USERS_ALL_CACHE).clear();
}

// 根据 user id 查询对象,存入 userById cache
@Cacheable(value = USER_BY_ID_CACHE, key = "#id")
@Transactional(readOnly = true)
public User getOne(Long id) {
    return userMapper.selectByPrimaryKey(id);
}

// 根据 user username,存入 userByLogin
@Cacheable(cacheNames = USER_BY_LOGIN_CACHE, key = "#username")
@Transactional(readOnly = true)
public User getByUsername(String username) {
    return userMapper.selectByUsername(username);
}
Controller 改改,都直接调用 mapper。如果要加入验证逻辑,可以在 web 层调用相关 service
...
@PostMapping("/users")
public void save(@RequestBody User user) {
    if (userService.getByUsername(user.getUsername()) != null) {
        throw new RuntimeException("exist");
    }
    userService.save(user);
}
...
改完就可以不用依赖 UserMapper 了,完了可以针对 Controller 发起请求各种测试,观察缓存的变化情况(Redis 可以用 RedisDesktopMananger)
测试脚本
供参考的测试 curl 脚本
# 查询所有用户
curl http://localhost:8080/users
# 查询单个用户
curl http://localhost:8080/users/1
# 新建用户
curl -X POST -H "Content-Type:application/json" -d '{"id":3, "username":"annaleaf", "password":"333333"}' http://localhost:8080/users
# 更新用户
curl -X PUT -H "Content-Type:application/json" -d '{"id":1, "username":"yinguowei", "password":"222222"}' http://localhost:8080/users
# 删除用户
curl -X DELETE http://localhost:8080/users/1
监控和管理
对监控的管理可以再加入很多控制,比如 Cache 的 metric,手动或定时的清除,Cache 时间的监听
查看 Cache 数量
可以通过开启 Spring Boot Actuator 相关端点来查看 Cache 的使用情况:
management.endpoints.web.exposure.include=*
访问:http://localhost:8080/actuator/metrics/cache.size
手动清除缓存
可以设置手动或定时任务清除所有或部分 Cache
public void purgeAllCaches() {
    logger.info("CacheClearTask.purgeAllCaches");
    cacheManager.getCacheNames().parallelStream().forEach(
            name -> Objects.requireNonNull(cacheManager.getCache(name)).clear());
}
CacheManagerCheck
写了一个用于检查当前的 CacheManager,参考:CacheManagerCheck.java
@Component
public class CacheManagerCheck implements CommandLineRunner {

    private static final Logger logger = LoggerFactory.getLogger(CacheManagerCheck.class);

    private final CacheManager cacheManager;

    public CacheManagerCheck(CacheManager cacheManager) {
        this.cacheManager = cacheManager;
    }

    @Override
    public void run(String... strings) throws Exception {
        logger.info("\n\n" + "=========================================================\n"
                + "Using cache manager: " + this.cacheManager.getClass().getName() + "\n"
                + "=========================================================\n\n");
    }
}